The following are the steps that I needed to do, to install custom Android ROM to Samsung I9301I Galaxy S3 Neo.
- Install custom recovery
- Install custom rom
- Optionally install gapps
1. Installing custom recovery mode
1. We gonna install TWRP recovery mode.
Go to twrp.me/Devices , search for your phone and download it.
Or visit https://eu.dl.twrp.me/s3ve3g/ and download the twrp-3.3.1-1-s3ve3g.img or latest if it exists.
2. After that we need a way to install it to our phone. I used Odin,
the ROM Flashing tool for SAMSUNG Android Smartphone, for this job.
Go to https://odindownload.com/ and download it.
3. Connect your phone with your computer with usb cable. To start installing new custom recovery mode you have to put your phone into “download state”. So pres volume down, home and power button. Then a warning screen will pop up where you press volume up to continue.
4. Now open Odin tool. In the options uncheck “Auto reboot”. Then click back to log, so that you will see the info when flashing. Then click button “BL” and search for TWRP img file and select it. After that you are ready to press “Start” button.
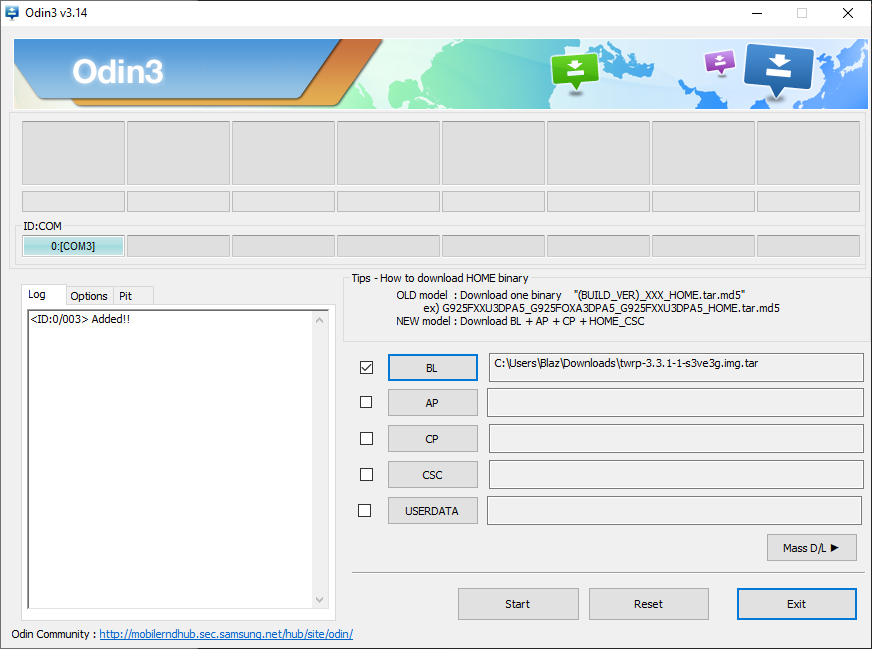
5. After Odin finishes installing new custom recovery, you can press volume up, home and power button. Now you should enter the new recovery mode.
NOTE: If you are installing it on a different device, then you maybe have to hold different buttons to enter download / recovery mode.
2. Installing custom ROM
I have used Lineage OS 16
https://www.lineageoslog.com/
So here we have three diferent versions:
– Samsung Galaxy S III Neo (Samsung Camera) -> s3ve3gjv
– Samsung Galaxy S III Neo (Sony Camera) -> s3ve3gxx
– Samsung Galaxy S III Neo (Dual SIM) -> s3ve3gds
To figure it out which camera you have, you can use app called AIDA64 and under devices take a look at camera properties.
1. After you downloaded appropriate zip file copy it to your internal storage.
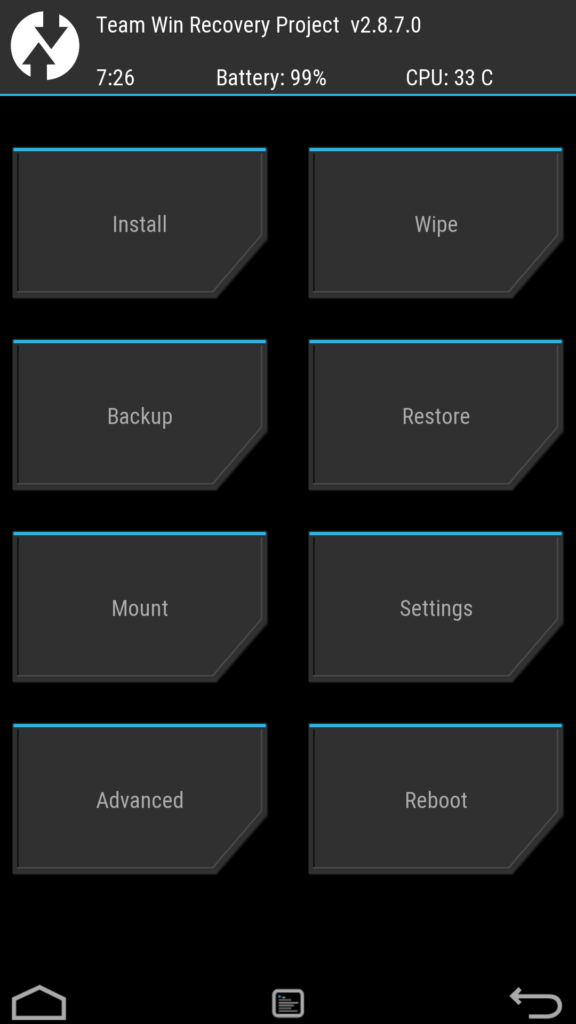
2. Now you should be inside the recovery mode and click on the “Install” button, select the zip file and install it.
3. After instalations is done press reboot button and wait that system is loaded for the first time.
NOTE: In case that you get back into recovery mode, then it could be that you have chose a wrong ROM image.
3. Installing Google apps
So the ROMs come without any additional apps.
So if you want to have like Google Play store, so that you can install some apps, then you need to get and install GApps.
1. Go to https://androidfilehost.com/?w=files&flid=5648 and download the zip file.
For S3 Neo phone I had to choose ARM. And then the version of the Android, which you can find in the settings under “About the phone”.
After that you have to choose the “size” of GApps, the bigger the size the more apps will be included.
I chose micro and I got Google Play store, Gmail, Gcalendar.
2. After you got the file, the process of installing is the same as for installing rom. Just go to recovery mode (vol up, home & power button) then press “Install” and choose your file and install it.
3. After installation is done, wipe the cache and that is all.